It’s the same every year… you spend weeks leading up to the school holidays racking your brain for fun things to do with your children. Go to the park? That will work once or twice. Get a craft box? No, did that last year! Well, we’ve got a question for you while you do your planning… have you tried at-home science experiments for kids?

Kiselev Andrey Valerevich/shutterstock.com
I know what you’re thinking! That sounds like a recipe for disaster… but trust me on this one, these science experiments will be a hit both with kids AND adults. You know, the hands-on, brain-sparking kind of experiments! The kind that don’t make a mess, and don’t cost the earth to recreate. If you haven’t added some fun at-home science to your list of activities for the holidays, then now’s your chance!
At-Home Science Experiments for Kids
These experiments both use simple equipment you will likely already have at home in your kitchen. They are fun and easy, and best of all – they will make your kids’ brains buzz and get them thinking ALL the scientific thoughts!
We’ve picked a fun experiment for the middle years, and another for the upper years – but both can be slightly altered to suit your children, no matter the age.
Complete these experiments for a bit of laid-back fun, or make it a challenge and get your children to complete a Design Your Own Experiment Worksheet to explore the concepts of variables, fair test, hypothesis, observation and results.
Middle Years – Rainbow Rainfall Experiment
This experiment is quick and effective – just watch your kids’ eyes light up in fascination!
Aim: To investigate the density of food dye when mixed with oil and water.
Equipment
- food dye in several colours
- a glass of warm water
- a small amount of cooking oil
- a spoon or fork for mixing
Method
- Fill a glass approximately 3/4 full with warm water.
- In a separate dish, pour a small amount of cooking oil. You want enough to have a definitive amount sitting on top of your water, but not so much that your cup overflows.
- Drop 4 – 5 drops of each colour of food dye into the oil, spacing the drops out as much as you can.
- Using a spoon or fork, gently stir the oil so that the food dye drops separate.
- Pour your oil into your warm water and watch the rain!
Scientific Thinking – This experiment demonstrates the difference density of oil, food colouring and water. Specifically, it shows that food dye behaves differently in substances of different density and molecular polarity.
Because the molecules of water and oil are different from each other, they do not mix. Oil is less dense than water, so it floats on top of it. When mixed with food dye, the dye is too heavy to sit within the oil and will drop through it into the water. When it hits the water and starts to dissolve, it creates beautifully coloured ‘rain’!
Possible investigation questions:
- Which do you think is most dense? The water, dye or oil?
- Is there some way to get the food dye out of the cooking oil? Why or why not?
- Why do all the drops of food dye hit the water at different times?
Upper Years – Moving Water Experiment
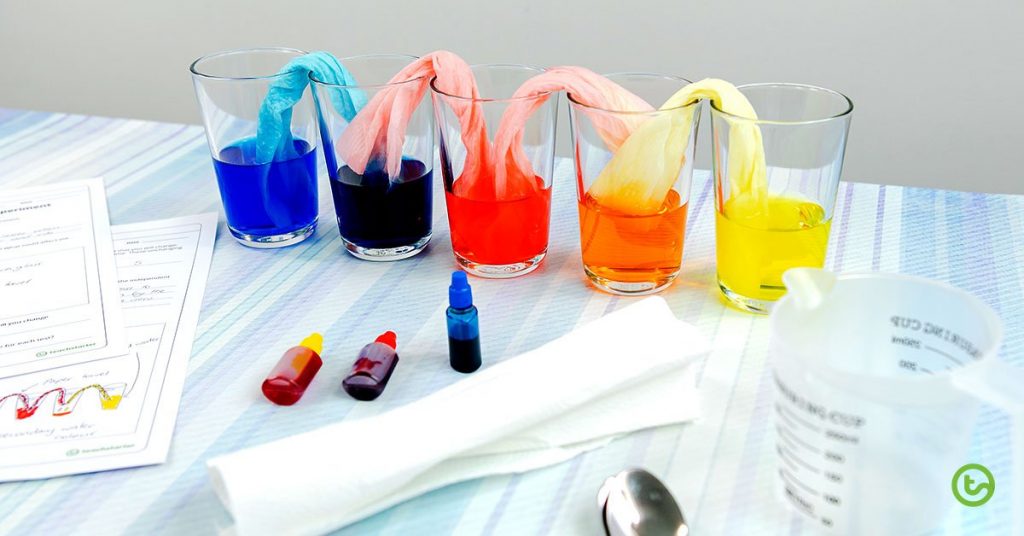
This investigation explores water movement! It does take a couple of hours for the results to finalise, so it’s best an experiment that you set and forget. Perhaps take a picture every half hour to monitor your progress!
Aim: To investigate the movement of water when it has paper towel placed in it.
Equipment
- a measuring cup
- 4 x pieces of paper towel
- red, blue and yellow food dye
- 5 x clear drinking cups/glasses (jars work well too!)
- water – enough to pour equal amounts into 3 of the cups
- 3 x mixing spoons
Method
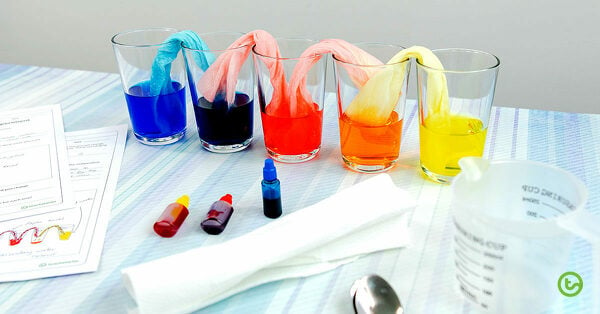
- Line up 5 cups. Fill cup number 1, 3 and 5 with equal amounts of water. In our experiment, we used 200ml of water per cup, but this will depend on the size of your cups.
- Place equal drops of food dye into each cup of water – place blue into one cup, red into another, and yellow into the final cup. Mix each cup thoroughly with a new spoon to prevent cross-contamination.
- Place a scrunched piece of paper towel so that it creates a bridge between each cup in the line. The paper towel must be quite deep in the water in each cup.
- Watch what happens over the next few hours and record your results!
Scientific Thinking – This activity teaches students about capillary action.
This is similar to the way that the roots of a tree take water up and out of the ground. You can observe the movement and direction of the water by watching the water move up the paper towel, and observing the empty cups filling with a ‘new’ coloured water as the two primary colours on either side mix together.
Possible questions you could ask your children:
- What will the food dye from one cup do when it mixes with the dye from another cup?
- Why do you think the water didn’t move backward once the empty cups started to fill up?
- Why do you think the water stopped moving once the cups leveled out?
Love these at-home science experiments for kids? Take a look at these resources for more at-home science fun!
The post Easy At-Home Science Experiments for Kids appeared first on Teach Starter.
